|
|
|
|
Cyanotypes
Who was Anna Atkins?
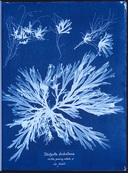
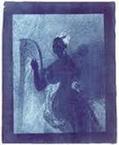
The cyanotype process was used most famously by Anna Atkins’s in her 12 part book British Algae: Cyanotype Impressions. This was the first book ever to be illustrated with photographs making her a real pioneer of the new art form. Cyanotypes were amongst the first ever kinds of photographs that did not require a camera. In essence, they describe perfectly the meaning of the word ‘photography’ - photo = light; graph = to draw. Therefore, photography = drawing with light.
Atkins was an expert botanist and illustrator of plants. She discovered the cyanotype process after meeting the British inventor Fox Talbot. Atkins neighbour was the astronomer Sir John Herschel and it was he who discovered, in 1842, that when exposed to UV light (i.e. sun) a paper soaked a with a complex iron salt solution captured a blue “negative” image, once the salts had been rinsed away. For obvious reasons, Herschel named these prints Cyanotypes or blueprints.
As well as the blue background which suggested the water from which her plants had originated, Atkins must have been pleased with the way the cyanotype process captured the tiniest and most subtle of details of the plants she was studying.
What are the advantages of cyanotypes?
The cyanotype process is relatively cheap and easy to use. A wide range of surfaces can be coated with the mixture of chemicals and you don't need a darkroom or any complicated equipment. Perhaps this is why artists are still using the process, sometimes to make quite large and unusual photographs.
Some examples of cyanotypes
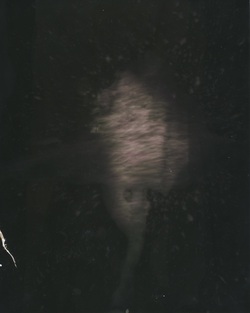
For example, here is a mattress which has been soaked with chemicals and then used to capture the outline of a sleeping person. A set of tiles has also been used to create a puzzle like composition of plant forms. Finally, the curling forms of magnetic tape spilling from cassettes echoes the plant forms captured by Anna Atkins all those years ago at the dawn of photography.
0
Image #1:
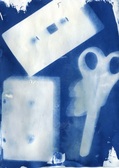
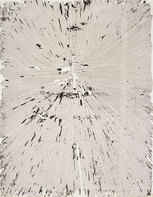
I began by using quite heavy objects. These created clear (negative) shapes making quite a strong composition. You can see the shadow cast by the scissors where the light has crept under the blades. However, there is not enough detail or texture in the image to make it particularly successful.
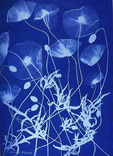
Image 2:
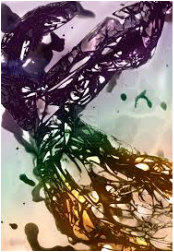
In my second attempt I wanted to use a lighter material so I chose a tape measure. You can see some of the measurement marks on the tape at the top of the image. Where the tape was not in direct contact with the paper the image is more faint. I really like the effect created when bits of tape overlap, shielding more light from the paper and therefore creating a whiter shape. The pate looks quite organic, like strands of seaweed or leaves and this reminds me of Anna Atkins' images. I am really pleased with this image. Next time, I would like to experiment with mixing my own chemicals and applying them to an unusual surface, possibly working at a larger scale.
Who was Anna Atkins?
The cyanotype process was used most famously by Anna Atkins’s in her 12 part book British Algae: Cyanotype Impressions. This was the first book ever to be illustrated with photographs making her a real pioneer of the new art form. Cyanotypes were amongst the first ever kinds of photographs that did not require a camera. In essence, they describe perfectly the meaning of the word ‘photography’ - photo = light; graph = to draw. Therefore, photography = drawing with light.
Atkins was an expert botanist and illustrator of plants. She discovered the cyanotype process after meeting the British inventor Fox Talbot. Atkins neighbour was the astronomer Sir John Herschel and it was he who discovered, in 1842, that when exposed to UV light (i.e. sun) a paper soaked a with a complex iron salt solution captured a blue “negative” image, once the salts had been rinsed away. For obvious reasons, Herschel named these prints Cyanotypes or blueprints.
As well as the blue background which suggested the water from which her plants had originated, Atkins must have been pleased with the way the cyanotype process captured the tiniest and most subtle of details of the plants she was studying.
What are the advantages of cyanotypes?
The cyanotype process is relatively cheap and easy to use. A wide range of surfaces can be coated with the mixture of chemicals and you don't need a darkroom or any complicated equipment. Perhaps this is why artists are still using the process, sometimes to make quite large and unusual photographs.
Some examples of cyanotypes
For example, here is a mattress which has been soaked with chemicals and then used to capture the outline of a sleeping person. A set of tiles has also been used to create a puzzle like composition of plant forms. Finally, the curling forms of magnetic tape spilling from cassettes echoes the plant forms captured by Anna Atkins all those years ago at the dawn of photography.
0
Image #1:
I began by using quite heavy objects. These created clear (negative) shapes making quite a strong composition. You can see the shadow cast by the scissors where the light has crept under the blades. However, there is not enough detail or texture in the image to make it particularly successful.
Image 2:
In my second attempt I wanted to use a lighter material so I chose a tape measure. You can see some of the measurement marks on the tape at the top of the image. Where the tape was not in direct contact with the paper the image is more faint. I really like the effect created when bits of tape overlap, shielding more light from the paper and therefore creating a whiter shape. The pate looks quite organic, like strands of seaweed or leaves and this reminds me of Anna Atkins' images. I am really pleased with this image. Next time, I would like to experiment with mixing my own chemicals and applying them to an unusual surface, possibly working at a larger scale.
Photograms
What you need:
Light sensitive paper
As you’re not making an actual replica of a picture it doesn’t matter if your paper gets exposed to light, just be sure not to exposure the whole box. You will need three trays, one for each chemical. Set them up as recommended by the brand for paper development, not film. For ease of reference, label each tray. Okay, you’re ready to go!
How to create positive images
Select your chosen object; usually more absorbent objects work best such as flowers, leaves and plants. You can also create hand prints if you’re sure to wash your hand extremely well straight after. Dip your object into the developer. This is just a dip, shake off any excess liquid. Carefully place onto your light sensitive paper cover with a paper towel. Evenly press down and hold for 40-60 seconds.
Remove, and magic! A black detailed print of your chosen object! Now to keep it there place the paper into the stop for 30 seconds then remove and place into the fixer for 5-10 minutes with regular agitation. Wash off in another clean water tray of a sink for 5 minutes to rid it of any chemicals. Complete!
What you need:
Light sensitive paper
- Three trays
- Developer, Stop and Fixer chemicals.
- No darkroom needed
- Paper towels / kitchen towels would be handy.
As you’re not making an actual replica of a picture it doesn’t matter if your paper gets exposed to light, just be sure not to exposure the whole box. You will need three trays, one for each chemical. Set them up as recommended by the brand for paper development, not film. For ease of reference, label each tray. Okay, you’re ready to go!
How to create positive images
Select your chosen object; usually more absorbent objects work best such as flowers, leaves and plants. You can also create hand prints if you’re sure to wash your hand extremely well straight after. Dip your object into the developer. This is just a dip, shake off any excess liquid. Carefully place onto your light sensitive paper cover with a paper towel. Evenly press down and hold for 40-60 seconds.
Remove, and magic! A black detailed print of your chosen object! Now to keep it there place the paper into the stop for 30 seconds then remove and place into the fixer for 5-10 minutes with regular agitation. Wash off in another clean water tray of a sink for 5 minutes to rid it of any chemicals. Complete!
Timeline
John Herschels' Cyanotype 1792
Pierre Cordier's Chemigram1966
A.E. Graves's chemigrams
2005 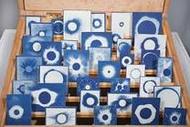
Dario Robleto's Cyanotypes 2012 extra research Camera-less photography: techniques'Untitled, (Körperfotogramm), gelatin-silver print photogram by Floris Neusüss, Berlin, Germany, 1962. Collection Chistian Diener, Berlin © Courtesy of Floris Neusüss Still from the film 'Shadow Catchers: Camera-less Photography' (Adam Fuss), 2010. © Courtesy of V&A The essence of photography lies in its seemingly magical ability to fix shadows on light-sensitive surfaces. Normally, this requires a camera, but not always. Several artists work without a camera, creating images on photographic paper by casting shadows and manipulating light, or by chemically treating the surface of the paper. Images made with a camera imply a documentary role. In contrast, camera-less photographs show what has never really existed. They are also always ‘an original’ because they are not made from a negative. Encountered as fragments, traces, signs, memories or dreams, they leave room for the imagination, transforming the world of objects into a world of visions. Processes & techniques Camera-less photographs can be made using a variety of techniques, the most common of which are the photogram, the luminogram and the chemigram. These techniques are sometimes used in combination. Many involve an element of chance. ChemigramChemigrams are made by directly manipulating the surface of photographic paper, often with varnishes or oils and photographic chemicals. They are produced in full light and rely on the maker's skill in harnessing chance for creative effect. Documented experiments are often an important part of the process. Digital C-printA print made from digital images using digital printers. Inside such printers, chromogenic (or 'C'-type) photographic paper is exposed to red, green and blue lasers. The paper is then processed in the traditional, chemical-based manner. Images created by camera-less methods can be digitised and turned into C-prints. When processed in this way, camera-less images can be retouched, enlarged and reproduced as multiples. Dye destruction printA print made using direct positive colour paper. This paper was originally introduced in 1963 for printing colour transparencies or negatives. It is coated with at least three layers of emulsion, each of which is sensitised to one of the three primary colours. Each layer also contains a dye related to that colour. During development of the image, any unexposed dyes are bleached out (hence 'dye destruction'). The remaining dyes form a full-colour image. Gelatin-silver printA print made using paper that has been coated with gelatin containing silver salts. Where light strikes the silver salts, they become dark. The image is then developed out using chemical developer. The paper itself can have a matt or gloss surface, and the image can be toned. Introduced in 1871, the gelatin-silver print is still in general use today. LuminogramA variation of the photogram (see below). In a luminogram, light falling directly on the paper forms the image. Objects placed between the light and the paper (but not touching the paper) will filter or block the light, depending on whether they are transparent or opaque. PhotogramPhotograms are made by placing an object in contact with a photosensitive surface in the dark, and exposing both to light. Where the object blocks the light, either partially or fully, its shadow is recorded on the paper. The term 'photogram' seems to have appeared around 1925. The photogram artist is not able to predict the results in the viewfinder of a camera, and often works in the dark. The final image is only apparent after physical and chemical manipulation or development. |
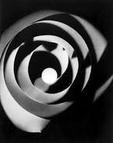
Man Ray's Photogram
1901 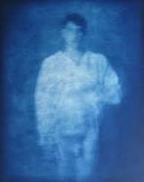
John
Dugdale's Cyanotype 2000 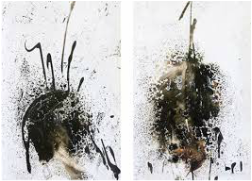
Claude Bouchez's chemigrams
2013 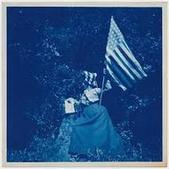
Jefferson Hayman Cyanotypes
2014 |
